
Object Source Lighting – the PRELUDE
My newest piece Valaska Sin is both an exercise in working to a tight deadline, so my painting was forced into a no-nonsense mode where I had absolutely no time to stop and think, and a study in source lighting, mood and ambience. These two exercises work surprisingly well together, because alternative lighting and moods are much better achieved when you work in an intuitive and spontaneous way rather than over thinking and analysing everything, which can easily happen when you set out to do something different and have too much time to do it.
Herzog von Bayern or as we better know it Duke of Bavaria painting competition was fast approaching. I had a big piece ready for the open competition and I had made a nice little display of historical miniatures. The historicals were a bit unusual as I had been experimenting a lot with source lighting lately and that was also applied to these miniatures. Those two displays were adequate, I did not need to bring more… yet I have always brought a fantasy display to these events. Every time. When I started, fantasy displays were my main thing, but I have branched out, widened my horizons so to speak.

the fantasy display – an exercise in ambience
Historical miniatures are just as important to me as fantasy these days. Yet I felt bad about not bringing a fantasy display, it was not important to win medals or anything, just my tradition and my desire to display my work, it has always included fantasy and I really didn’t like to break that tradition. I had 3 newer 28mm fantasy miniatures which was up to competition standard in my cabinet. Three 28mm’s could make a display and I was prepared to just bring them, but it would be a very small and unnoticeable display indeed, yet better than nothing. The three pieces had one thing in common, they were from the beginning of my period of experimenting with ambience and mood colours. So I thought with one week prior to departure for Bavaria; if I can make two more 28mm pieces, going all in on moods and light sources, I will actually be able to show up with a decent, coherent display. It was worth a try.
After two days the first piece was done, then followed two nights at work where I could do nothing but lay a little plan on how to tackle the final and crowning piece; Valaska Sin.
ENVISIONING A CONCEPT
I’ve had the Valaska Syn model from Hasslefree in my stash for years and she is one of my favourite Hasslefree girls, the model has such a strong pose yet she somehow maintains a distinct feminine expression and a certain vulnerability under all her strength as a female chaos warrior. I even started painting her a couple of years ago, but she was one of those projects that never got anywhere, so she had spent some time on my shelf of shame. I also had these hands lying around that I sculpted last summer as an exercise, both to learn some sculpting and to test myself, all for a big project I hope to finish later this year, but that is another story.
Some time ago I got the idea of placing Valaska Syn in the palm of the open hand as if she is standing in the hand of an ancient statue. In that way she was lifted up so I could light her from beneath. At that point I thought to maybe light her from a campfire. That was the safe decision as orange firelight is easy to explain on the other hand there is not that much storytelling in that and in the meantime I had made several other miniatures with firelight, so I needed something else.
I have been working a lot with source light, moods, ambience and generally alternative light sources lately, you can see more of my work HERE. To begin with it was very important for me to be able to explain a light source on a miniature, or else I thought it would not work. The easiest way to do that is by including the light source, thereby doing Object Source Lighting (OSL). There everything is explained, no need for guesses, you only have to capture the way the light works and everything is fine. I did that a lot with skaven models carrying around magical-mechanical devices with electrical or warp stone glow.
With Object Source Lighting you can also easily understand someone standing next to a fire, you don’t need to see the fire to know that unruly reflected orange/red/yellow light comes from a fire. Somebody staring at an instrument panel would logically be lit from below by an amber or green glow, so the subject matter can work with the light source and together they tell the story. After some time I came to the realisation that you really don’t need to explain your light source that much. Just as long as the light effect is executed properly and confidently, your and the viewers’ imaginations will do the rest and you actually end up with a rather refined and individual kind of storytelling. Sometimes the imagination can be much more powerful than the actual words or illustrations, why not use peoples’ imaginations as a tool like all the other tools in the box?

A reference photo, that has taught me a lot about how a single coloured light source works.
When you paint a coloured light source, bear in mind the chaotic and slightly illogical nature of light. Of course light will reflect from any surface turned towards the light source. But that is not all. Notice how the light creates an ambience and affects a whole area, it is almost as if the light is in the air sometimes. This is in part because the light travels very fast and gets reflected back and forth from surfaces turned towards those that are towards the light all sorts of surfaces, very little reflective behaviour is needed when you only have one light source. Scientific experiments have proven that beams of light can turn under certain conditions. No need to get so scientific and analytical when we are just painting miniatures. The most important thing is to paint the light the way we perceive it, to communicate the feeling of the light rather than depict a scientifically correct light source.
I have been thinking a lot about light lately and it was after all my main theme for this piece.
The story I wanted to tell with my Valaska Syn model was one of a desperate young woman, forced to call upon arcane powers at night to bring back her ancestors from the land of the dead to fight the oppressors of her people one last time. She would be lit from below her left side with an eerie sort of cold green ghost light. This would at least be the story playing out in my head working on her. The whole thing is actually so open and sketchy, so anybody seeing the miniature will get to make up their own story about her and her strange light which would be just as fine. I renamed her Valaska Sin, to give her my own fingerprint and because she is not a pure soul, she is a sinner, just not as bad as her enemies.
GETTING STARTED
When you work to such a tight deadline, you must make some fast, hard choices instead of just doing everything right. My miniature already had a little paint on her. I would normally have stripped it off, here I took the chance and just left it on, it was a quite thin layer after all. It is not the way I would recommend to do it, but if the choice is between getting stuck in the beginning of the project instead of just moving ahead, it is worth taking the chance. I was prepared to accept the situation and work with any lack of smoothness and if you do that, then many imperfections can help improve the expression of what you are doing.
The hand I had sculpted lacked details on the backs of the fingers; nails, knuckles etc. so I started out with a little sculpting session and added the last details to the hand. While I baked the Beesputty I could move on with other parts of the project.

My hand sculpting exercises, the open hand was just what I needed to display Valaska Sin.
I took one of Dino Pivato’s beautiful plinths, ground the front down and hollowed it out with my Dremel, so the arm would fit into it, being submerged in the soil, the hand sticking out. I cringed a little doing this, but it was necessary to what I had in mind. I don’t think Dino would mind, I think he would be happy to see his work used in an unusual way. It was even my last Dino plinth, so it was a good thing I was going to Duke of Bavaria, because there would be Dino and his shop, so I could restock. Unfortunately I did not get the chance to show him what I had done to his plinth because we had to pick up our miniatures very fast after the show and leave in a hurry, to catch our flight home.
Once the plinth was ground down and the hand done cooking I started to adjust everything and after a few extra passes with the Dremel I could make the hand fit into the plinth, arm and all. I build up a little rocky ground with Milliput around the hand, so it kind of poked out. That I topped off with a few drops of superglue and a little soil, the best groundwork material in my opinion. I immediately glued a few branches into place, some Mininatur foliage and a lot of photo etched leaves and plants, as many different shapes and sizes as I could cram unto the base. Most of them from Hasslefree and some from Secret Weapon miniatures as well.
When I create natural bases I find it very important to add many different plants in a haphazard way, notice how diverse and chaotic nature can be and in order to make such things work in such a small scale as this, you even have to amplify it. If you only place one or two different plants at equal distances and neat rows, it will look like a garden! My ancient, overgrown statue with Valaska Sin on top of it calling upon the spirits of her ancestors would be in a dense wilderness. It may seem a little illogical to put all the plants and foliage on before paint but since everything was to be painted in a very specific light situation, this was the best way to do it.
Lastly I pinned my fine lady on top of the hand.

The finished build all ready for paint.
UNDERCOATING AND THE FIRST BRUSH STROKES
I almost always use zenithal undercoat these days. Normally I spray it black, after heating the spray can a little, so I get better coverage in the recesses and a thinner layer. Then I spray it from above with white paint, no heating here, we do not want the white in the recesses. In that way I get a perfect analysis of all my miniature’s details, a good surface for the paint to grip on to and I get to see the lighting of the miniature before I paint. It is a great guide coat up until the point when I have covered it all, but by then I have often painted in a lot of light anyway, so I keep my guide.
On this one I decided to spray her white from below her left side. It was great to see how the volumes of the miniature reacted to a totally different light direction from what I mostly would work with.

A different undercoat that defines the direction of the light
At a later point when I was working on the light source with my airbrush I did not think this was such a good idea, because I could never hit the model as hard with the airbrush as I had with the spray. That got me into a little trouble, but it was nothing I couldn’t solve and with everything a little behind me I think it was the right thing to do.
To begin with I blocked in most of the colours. I wanted smoother transitions on her skin so I worked a simple light/dark gradient into the skin tone from the very beginning. It is also the most prominent feature of the miniature, so this would guide and inform me on the lighting throughout the painting. I used GW Elf Flesh for the brightest skin tone, GW Cadian Fleshtone for the midtone P3 Umbral Umber for the shadows, with these 3 colours I did a quick wet on wet sketch of her skin and blocked the rest of the colours in.
Moving on to the base I painted the plants in various shades of dark green and browns, letting everything sort of flow together and leaving a lot of black undercoat in the recesses, as it was a night scene. The big hand got a wet on wet sketch in 3 shades of grey, just like Valaska’s skin, no names here as they were just random mixes of black and white with a little bit of blue added in the areas outside the light source. I mixed in a little bit of Prussian blue in all the colours where they were not hit by my primary light source, as she is standing outside at night being lit up by that ghost light, so there will be a tiny secondary source of cold light from the moon, wherever she is not hit by the green light. The Prussian blue is a nice fat dark blue colour which I absolutely love, I use it in a tube of artists acrylics from Schmincke, it is good quality and a very powerful colour, I have one from Vallejo Model colour as well, but it is not nearly as dark or rich as the one from Schmincke.
I did not add the blue to her skin tone to begin with, as a blue skin tone can easily make a person look dead, but to tie everything together I glazed a little Prussian blue on her skin in the end, but only in areas of moonlight and outside of the ghost light. This really is an example of how I plan a piece, when I need to do it fast; I knew I needed to mix in the blue color, but to avoid troubles with the skin tone I thought ahead and added the color as a glaze in the end. That even had the added bonus of helping to even out the skin which I needed to do with several glazes anyway, so I sort of skipped a step so to speak.

Basic colours done, ready for the light effect.
LIGHT AND MAGIC
Now with all the basic colours in place it was time to add the main light source, which in this case is the Object Source Lighting. In order to capture the general ambience of the light effect, I glazed the whole area with Vallejo Game colour Jade Green. I did that several times intensifying the glazes the closer I got to the light source. I used a little Phthalo Green here and there to create variations and to add a little warmth where the green light faded out on Valaska’s skin. I did some of the glazes with my airbrush, in order to keep the direction of the light, but most with brush, in order to get into every recess to keep the ambience going, here it is extremely important to avoid pooling of paint, as what we need in the shadows is only a slight tinting of the colour and nothing more. After a lot of glazing I was satisfied with the ambience and it was time to start highlighting within the source light.

My colour choices for the ghost light effect
At first I airbrushed a little Titanium white in the direction of the light source, I even moved the Object Source Lighting effect down on the plinth as well. After that a few more glazes of Jade Green became much more powerful and opaque in the areas I had hit with the white. After that it was really a simple matter to add layers of opaque Jade Green on surfaces turned towards the light source. After that I added layers where I mixed in a little Titanium White, intensifying towards the light source, I ended with tiny highlights of pure Titanium White. If it got too chalky I could always glaze a little more green over it.
I normally prefer to paint true metallic, therefore I had started her axe and armour with a little Scale75 Black Metal with a little black added and her shoulder guards and earrings with a similarly darkened gold colour; after all that green glazing I realised that the metallic nature of the paint was all gone and I could easily get in trouble if I tried to make it metallic again, so I switched to Non Metallic Metal (NMM). It is a good thing that I did not have time to stop and think before acting, I could easily have been timid or even intimidated by doing NMM on a competition piece. Here it just sort of happened as the natural thing to do in the green coloured areas and then I just had to make the rest fit after. I had great fun painting the NMM and have made myself a promise to do more of that in the future and I really think I would have chosen otherwise if I had more time for this one. I am really proud of how the metallic elements turned out.
I returned several times to the light effect to push the light as far as I could, adding more Jade Green, more highlights, more Titanium White to the extremes.

The light source in place. Note how the green have taken over the metallics completely, the natural choice here is to paint it NMM, which I am about halfway through here
FINALISING THE PROJECT
With all the green ghost light in place I went from a barely started paint job to almost finished, this was what it was all about and everything I had done until that point, was more or less just a preparation for painting this light effect so all of a sudden sat there with a miniature that just needed the finishing touches.
The attention was now on the areas outside the green light. I worked some deeper shadows into her flesh tone, first with a little Strong Tone, then a little black glaze. Moonlight normally works by producing very dark shadows and small cold highlights, quite a stark contrast within a very narrow spectrum. I followed up my shadows with small cold highlights of Elf Flesh and White, to simulate this. After that I glazed with a little bit of Prussian Blue. Her skirt was black, so it was a simple matter to tidy that up, highlight with grey and ultimately white dots, then blue glaze.
Then came the metallics, there was this weird transition from green NMM on the front to dark true metallic block coloUr on the back side. I just painted those areas over with grey and made sure that I got a smooth transition into the green areas. Then I did the NMM with a lot of big dark reflections as it was in darkness and then a lot of tiny sharp white reflections to make it shiny. The usual Prussian Blue glaze here as well really helped to push the effect of the Object Source Lighting.
The big hand got a little bit of highlighting as well, though not nearly as much as Valaska herself. The plants around the hand got even less highlights, in that way I constantly kept focus on Valaska and the green light.
The very last step was to finish the plinth, my constant handling had worn the paint off in many places and made my matte black gloss. I airbrushed the plinth black, then I airbrushed a little more Jade Green where the plinth got the light and then I retouched that fat white highlight at the edge.

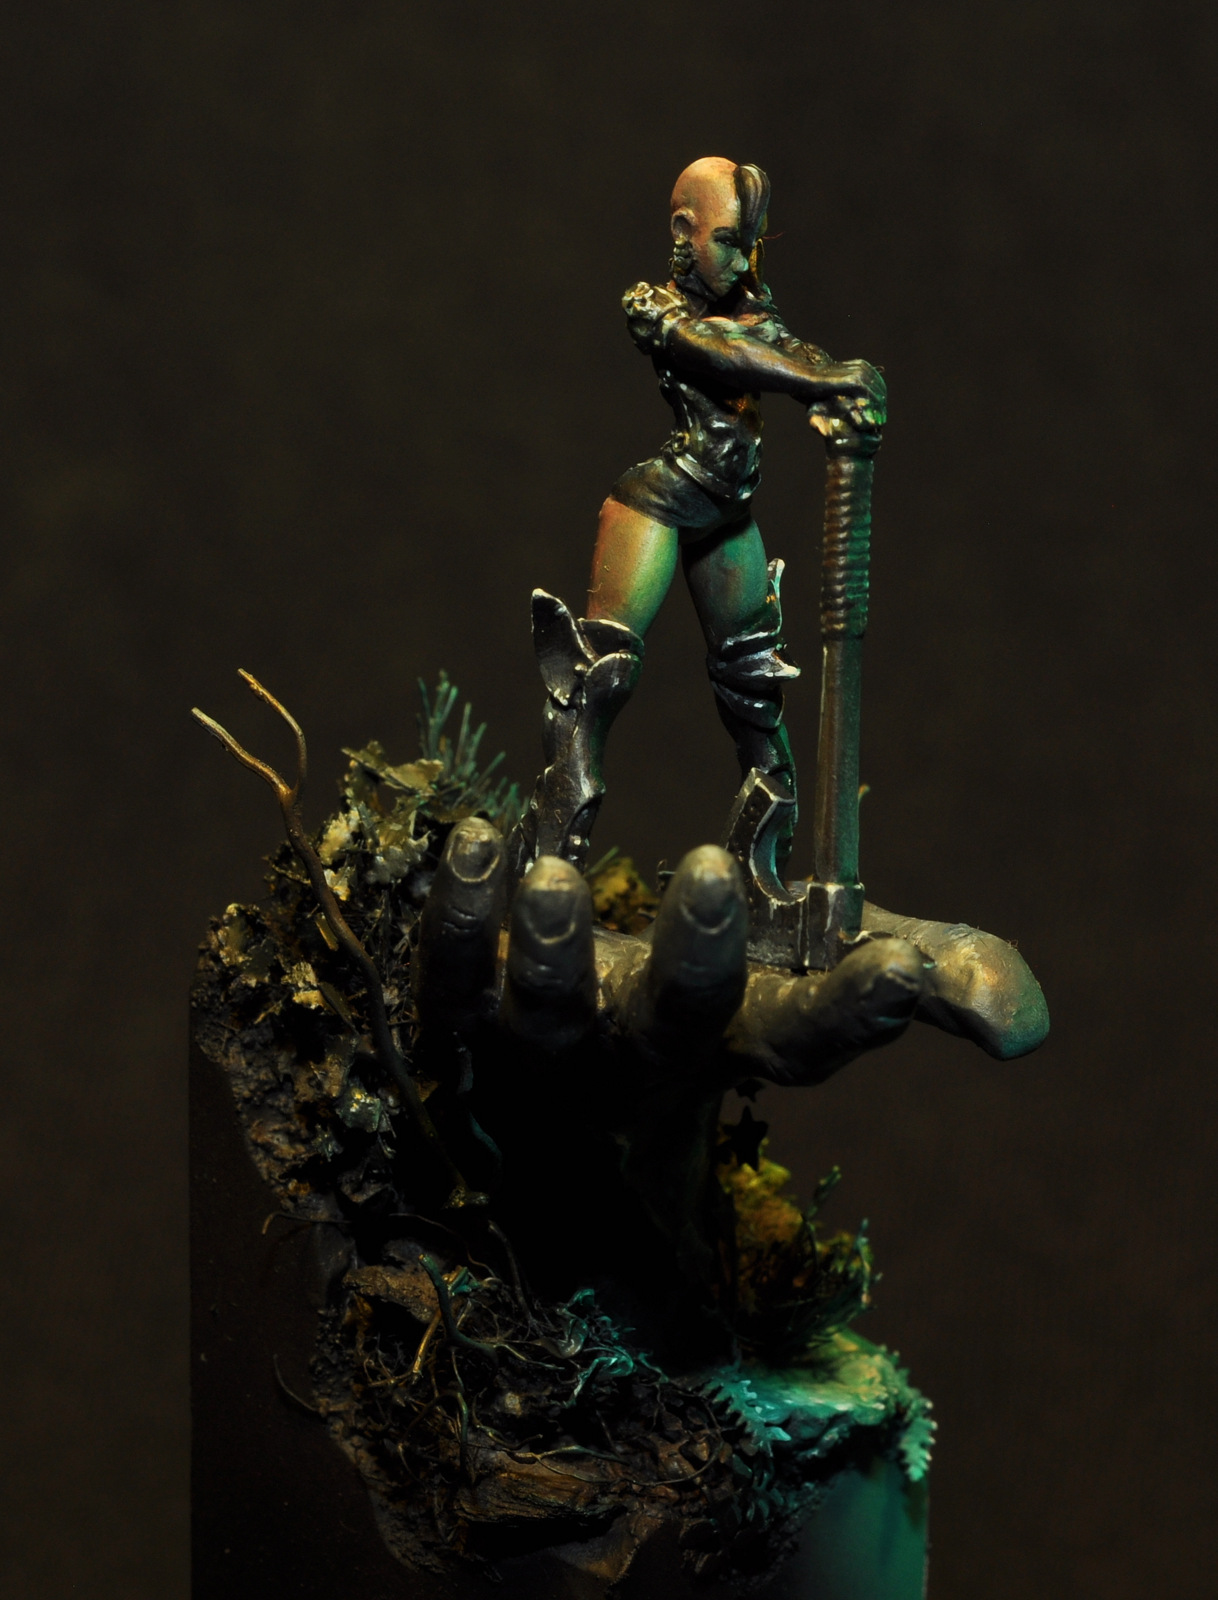
Valaska Sin in all her desperate glory.
EPILOGUE
So all done. I am very proud of the result and the level of coherency and ambience could probably not have been achieved if I had worked slower and therefore, thought about everything instead of just doing what felt right and got the job done at the time. I sometimes have a tendency to overdo things or add details and coloUurs, that really aren’t that necessary, here I just focused on pushing the important stuff as far as possible and almost left everything else out.
That kind of uncompromising painting really pays off and for me this was yet another lesson in that very fact, keep it simple, focus on what is important and don’t waste time on what is not. I went off to Duke of Bavaria the next day and had a wonderful time. My display of small fantasy miniatures won a bronze medal! I honestly did not expect that, but I am very proud of it.
Thank you for reading, I hope you enjoyed it and can find my thoughts useful or inspiring. And thank you to Jay and the rest of the Figurementors team for their warm welcome.
strong solid spots of light help to complete the illusion