
My Experience Painting OSL – PRELUDE
Object-Source Lighting (OSL), is probably one of the most intimidating techniques in miniature painting. I’m intentionally not calling this article “How to Paint OSL” because I feel like I have a long way to go before I come close to mastering the technique. That being said, I think I’ve had success at applying it… so hopefully that is enough to justify me wanting to share my thoughts.
GENERAL SKILLS TO HELP WITH OSL
This is something I don’t often see discussed in other OSL articles, but I feel this technique really builds off of some specific miniature painting skills. So if you don’t feel like you’re ready to take on the scary OSL, what can you work on instead to help prepare yourself?
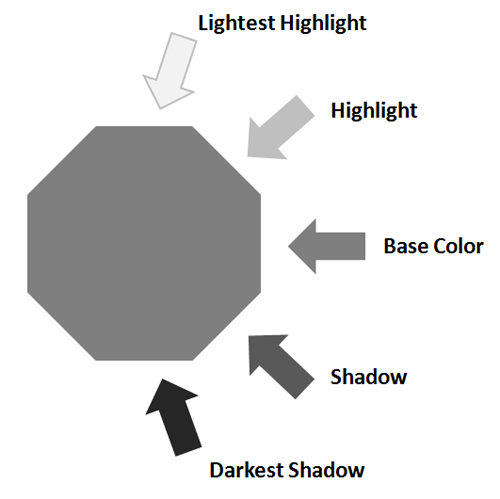
The “Stop Sign Rule” is just another way of describing zenithal lighting
Zenithal Lighting: Before taking on OSL, it’s really helpful to have a solid handle on regular (zenithal) lighting. Most people probably feel like they generally understand zenithal lighting, but you should ask yourself if you really have a strong understanding of how it works.
The key here (and why it’s so useful for OSL) is that you are painting the illusion that light is coming from a specific direction. In zenithal lighting the light is above the figure… but if you can do that accurately, it’s not that big a jump to start painting as if the light is coming from the side or below or anywhere else.
A helpful version of zenithal lighting is the “stop sign rule.” This really helps to illustrate that how light or dark a surface should be is dependent on the angle that is made with respect to the light. Take a look at the attached image to see what I mean.
Next time you’re painting a figure with a lot of cloth and folds, try using the idea of the stop sign rule to help you place those lights and shadows (and vary their intensity). You will be doing the exact same thing when you try OSL, but just imagining the light is somewhere other than above the mini!
High Contrast Painting: This is something that many people struggle with. Probably the most common critique people hear about their painting is “could use more contrast.” You don’t necessarily need to be going from black to white, but having a large range between your highlights and shadows generally makes more compelling figures.
Now, if you want to make it look like some object is providing lighting to the figure, then having a high contrast is even more critical. You won’t have the room lighting to help you out, you need to actually paint on the effect. So, if on a regular mini, you can already go from near black shadows to near white highlights, then you’re going to be in great shape to paint OSL.

A look at the figure during different stages of the painting process
NMM (Non-Metallic Metals): Oh no, I’ve got to master another difficult technique before trying OSL? Well, not exactly… but if your OSL piece is going to require you to paint metal, there’s a good chance you’ll want to use NMM instead of TMM. It depends a bit on how much metal you’ve got and how significant the OSL will be (is it a little glow or the primary light source?).
The room lighting will react with metallic paint and you won’t have complete control over where the highlights are. If you want to use the metal portions of the figure to help sell the illusion that there’s a separate light source on the figure, then NMM is going to help you do that more effectively.
The Good News: You don’t have to master all of that to paint OSL. But it’s helpful if you feel at least somewhat comfortable with them. These are just things you can practice with and build those painting muscles to help you be successful when you do decide to try your hand at OSL.
TIPS FOR OSL
Now that you (hopefully) feel ready to give OSL a try, what are some tips that might help?
Look at the figure from the point of view of the light:

By initially leaving the lantern off, I could more easily view the various parts of the figure from the point of view of the light source
When I painted my hobbit piece, I kept holding the figure so I could see the different parts from the point of view of the lantern.
The surfaces I could see were the same surfaces that would be hit by the light. The surfaces that were blocked were obviously the ones that wouldn’t get the light. This can really help you visualize where the light should be.
If you’re stuck on zenithal lighting, try rotating the figure so that wherever the light source is coming from is now ‘up’ and then start painting. This only works if you combine it with high contrast. When you put the figure back down the right way, the room lights will no longer be helping you with the effect. Without high contrast it’s not going to show nearly as well.
Light makes things brighter: Okay, you can file this tip under ‘duh,’ but it’s still worth keeping in mind. The lit area should always be brighter than it otherwise would have been. So, if you’re painting a green light hitting a near white surface, then the green you use has to be even lighter than the surface! Maybe, instead of trying to paint OSL on a near white surface you start out with a medium grey one or some other darker colour.
That can make the difference between something looking like it has got green paint spilled on it and looking like it’s actually got a green glow.
Materials react differently to light: How much light an object reflects is dependent on the material that the object is made up of. Perhaps an easier way to think about this is the ‘finish’ of the object. Everything reflects light, but something with a satin finish should reflect more than a matte finish. Meanwhile a glossy or metallic finish should reflect more than a matte or satin finish.
That doesn’t mean that the satin object is brighter overall than the matte one but for the surfaces pointed directly at the light, where you have the brightest highlights, the bright spot on the satin or metallic surface should be lighter than the bright spot on the matte surface. So that leather belt (satin finish) should appear to sparkle more than the matte coat fabric right next to it.
Keep in mind I’m talking about imagined finishes. You’re not actually varnishing the figure with a gloss or satin varnish. But you are trying to paint it so it looks like it might be glossy or satin.

Falloff Example – Compare the purple and green shades on the left and right legs. The colors on the leg closer to the light are much brighter.
Think about falloff of the light and BE CONSISTENT WITH IT! As you get further away from the light source, the intensity of the light diminishes. This happens uniformly in all directions. Think of it as larger and larger spheres that are each centered on the light source. Whatever the inner most sphere touches is brightest. Then slightly dimmer is what’s touched by the next sphere, then the next sphere, and so on.
The bright spots on different sections of the figure (which are equal in distance from the light source), should be of equal brightness. This can be tough to pull off, but the more consistent you are with the falloff in the brightness of your light, the more believable your OSL illusion will be.
NOTE: Keep in mind this goes hand in hand with the previous point that different materials reflect light differently. All parts experience falloff, but the glossy/metallic portions and, to a lesser extent, the satin parts will be more effective at picking up low light than the matte portions.
Remember you have artistic license: Never forget that every rule I’ve talked about can be bent or broken if you’ve got a good reason to do it. Mini painting is an art and therefore you can exercise your artistic freedom! Why or when might you use this? Well, in the hobbit example, the lantern would not have lit the face as much as I’ve painted it. But, the face is always a focal point of the figure. So I pretended the lantern was actually slightly more in front of the face that it really was. This lead to more light being painted on the face and produced what I think is a better result. I didn’t necessarily break the rules, but I bent them in order to improve the piece.
These are many of the skills and thoughts going through my head that I think helped me create a successful OSL focused piece. Hopefully this gives you some ideas and hopefully a bit of motivation to try your own hand at OSL. Don’t get discouraged, keep trying and you will get there!
Thanks for reading!
David Powell
